Widgets Demo App
The example app described here, shows user how to draw widgets within the header, footer and body of the WiPhone screen. The app shows how to draw rectangle widgets with different colors and dimensions, aligning text within a label widget and aligning widgets within the WiPhone screen.
- After completing this Example, user will learn how to:
- Draw a widget in WiPhone
- Control different attributes of a widgets like its size, alignment, color and placement on screen.
- Create label for a widget
How it works in WiPhone Interface
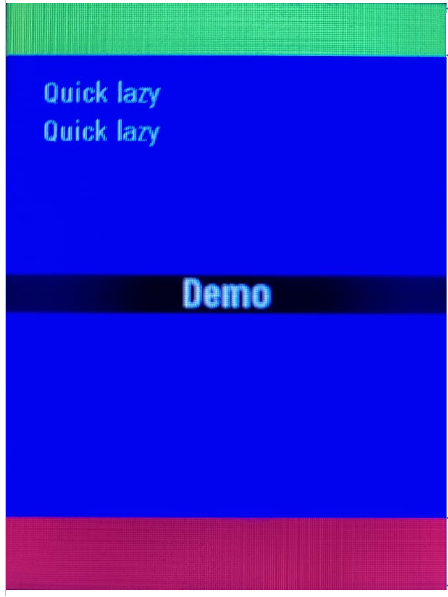
The example can be found within the WiPhone Menu Section; Tools -> Development -> Widgets Demo. Once you click open that App, an activity screen without any title will open, where you see a label with text "Demo" Placed in Center of display. Instead of a title, there's a green rectangle on top of the screen. Pressing "Back" key exits the App. WiPhone's screenshot for this App activity is given below.
Implementation in Firmware
Drawing Widgets in WiPhone
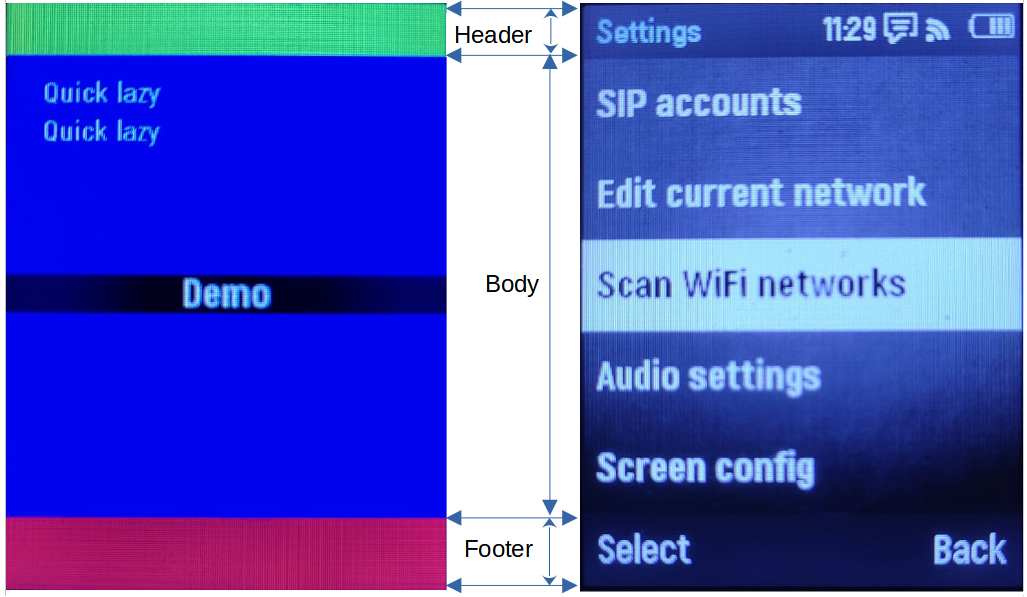
Before start implementing this App, user needs to understand the widgets handling in WiPhone's firmware and how they look like on WiPhone display. In figures below, the first figure shows the size of the header, body and footer of the WiPhone display while the second figure shows how three rectangles fit in with the header, body and footer in WiPhone's screen display. In firmware, user can see three rectangles fits the header, body and the footer of the WiPhone display by looking at the constructor of the WidgetsDemoApp. Code snippet for this can be found at Widget source.
Identify Major Files & Functions
- GUI.h
- GUI.cpp
- processEvent (EventType event)
- redrawScreen (bool redrawAll)
- typedef enum ActionID : uint16_t {}
- GUIMenuItem menu[xx] PROGMEM = {}
- void GUI::enterApp (ActionID_t app)
Declaring a unique name for your app in GUI.h file
Search for "typedef enum ActionID" method in GUI.h and put your app name "GUI_APP_WIDGETS" as Action ID at designated place`.
Adding App Class into Header File
Insert following class code into GUI.h file.
GUI.h:
class WidgetDemoApp : public WiPhoneApp {
public:
  WidgetDemoApp(LCD& disp, ControlState& state);
  virtual ~WidgetDemoApp();
  ActionID_t getId() {
    return GUI_APP_WIDGETS;
  };
  appEventResult processEvent(EventType event);
  void redrawScreen(bool redrawAll=false);
protected:
  GUIWidget* widgets[3];
  LabelWidget* label;
};
Instantiating the App
Before defining the App classes, search for :ref: enterApp method in GUI.cpp file and append below line in switch statement to instantiate the App object. Note that the constructor of the WidgetDemoApp doesn't take header and footer objects as input parameters. This is because it doesn't display them, instead, it displays rectangles which covers the header and footer of the WiPhone screen.
GUI.cpp
case GUI_APP_WIDGETS:
 // NOTE : THIS IS AN EXAMPLE WIDGETS DEMO APP
 runningApp = new WidgetDemoApp(*screen, state);
 break;
The designated place to add above line within the switch statement in code can be found at enterApp Method in GUI.cpp.
Define App Constructor
A constructor method that we already instantiated in step above, needs to be defined first in GUI.CPP. Let’s focus on the assignments for widgets[x]. They are for creating three rectangles with RectWidget class. Arguments for RectWidget class:
- First two are the x and y coordinates of the top-left corner
- the next two are the width and height of the rectangle
- last one is to fill color in rectangle.
The object “widgets[0]” represents the rectangle which fits with the header area, “widgets[1]” represents the rectangle which fits the body area and “widgets[2]” represents the rectangle which fits the footer area. The object with name “label” is created with LabelWidget class.
label = new LabelWidget(…);
It is created with parameters so as to display a label with text “Demo” (see the fifth argument) at the center of the body. The background color of this label is “BLACK” and the text color is “WHITE”. Last two arguments are for font and horizontal aligment of the “Demo” text.
WidgetDemoApp::WidgetDemoApp(LCD& lcd, ControlState& state) : WiPhoneApp(lcd, state) {
  log_d("create WidgetDemoApp");
  widgets[0] = new RectWidget(0, 0, lcd.width(), THEME_HEADER_SIZE, GREEN);
  widgets[1] = new RectWidget(0, THEME_HEADER_SIZE, lcd.width(), lcd.height() - THEME_HEADER_SIZE - THEME_FOOTER_SIZE, BLUE);
  widgets[2] = new RectWidget(0, lcd.height() - THEME_FOOTER_SIZE, lcd.width(), THEME_FOOTER_SIZE, RED);
  label = new LabelWidget(0, (lcd.height()-fonts[AKROBAT_EXTRABOLD_22]->height())/2, lcd.width(), fonts[AKROBAT_EXTRABOLD_22]->height(),
                          "Demo", WHITE, BLACK, fonts[AKROBAT_EXTRABOLD_22], LabelWidget::CENTER);
}
Declare and Define other Methods
This segments will show us a way of adding source code of other functions/ methods used in Widgets Demo Example. We declare and define these methods within the firmware code to fully implement our example App and subsequently put in place in GUI.cpp file. These functions are defined outside the WidgetDemoApp class and thus presented here with scope resolution operator (::) as below:
- WidgetDemoApp::~WidgetDemoApp()
- WidgetDemoApp::processEvent(EventType event);
- WidgetDemoApp::redrawScreen(bool redrawAll);
WidgetDemoApp::~WidgetDemoApp(); This function defines WidgetDemoApp's destructor to release memory after usage. All widgets must be registered and deleted by WiPhoneApp destructor.
 WidgetDemoApp::~WidgetDemoApp() {
    log_d("destroy WidgetDemoApp");

delete widgets[0];
delete widgets[1];
delete widgets[2];
delete label;
 }
The destructor of apps are called within the infinite loop of the WiPhone as follows.
appEventResult GUI::processEvent(uint32_t now, EventType event) {
   ...
   appEventResult appRes = runningApp->processEvent(event);
   if (appRes & EXIT_APP) {
          ...
          delete runningApp;// invokes the destructor
          ...
   }
WidgetDemoApp::processEvent(EventType event); This function defines the app events that processes the key press event.
 appEventResult WidgetDemoApp::processEvent(EventType event) {
log_d("processEvent WidgetDemoApp");
if (LOGIC_BUTTON_BACK(event)) { return EXIT_APP; } return REDRAW_SCREEN;
}
As seen in the processEvent method, all objects with class WidgetDemoApp processes only LOGIC_BUTTON_BACK key then closes the app. Now, a question may arises: How can the processEvent of this class be called? The processEvent method of the currently running app is called in GUI::processEvent method.
appEventResult appRes = runningApp->processEvent(event);
WidgetDemoApp::redrawScreen(bool redrawAll); This method omits the input parameter redrawAll. It draws four objects which is created in the constructor. The “label” object is type-casted to one of its superclasses (base classes) with name GUIWidget because the GUIWidget class has redraw method. Then, it draws two texts as two lines on top of the body. Both displays the text “Quick lazy”.
void WidgetDemoApp::redrawScreen(bool redrawAll) {
  log_i("redraw WidgetDemoApp");
  widgets[0]->redraw(lcd);
  widgets[1]->redraw(lcd);
  widgets[2]->redraw(lcd);

  ((GUIWidget *) label)->redraw(lcd);

  lcd.setTextDatum(TL_DATUM);

  lcd.setSmoothTransparency(true);
  lcd.setTextColor(WHITE, BLUE);
  lcd.setTextFont(fonts[AKROBAT_BOLD_16]);
  // WARNING: the following might produce deformed text due to hardware problems while drawing horizontal 1px lines
  // SOLUTIONS: 1) use only non-transparent font so that window is never set to 1px height (as in the following)
  //            2) use sprites
  //            3) use SPI_MODE3
  lcd.drawString("Quick lazy", 20, 43);
  lcd.setSmoothTransparency(false);
  lcd.drawString("Quick lazy", 20, 43 + lcd.fontHeight() + 5);
}