LoRa App Example
The example app described here, aims for users who want to utilize LoRa (Long Range), a radio communication protocol used as messaging service, in their custom apps. It describes the process to send or receive text messages by using the LoRa daughter board, a dedicated hardware board which mounts on the back of primary WiPhone's PCB to activate this message communication in WiPhone. Range of communication may reaches upto few hundred Kilometers depending upon the terrain and environment in the vicinity.
- After completing this Example, user will learn how to:
- Send data ("PING" or "PONG") to another device with LoRa messaging enabled
- Receive a data from another device through LoRa communication
- Initialize RHSoftwareSPI and RH_RF95 software objects for WiPhone to use LoRa device daughterboard
How it works in WiPhone Interface
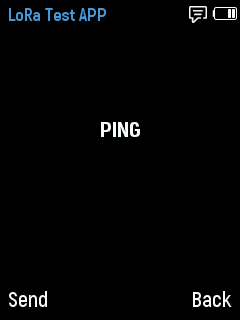
This example can be found in WiPhone menu like; Tools -> Development -> Software Examples -> LoRa App. Once you select that app, the main activity page will open containing a text header "LoRa Test App", an empty body, and two buttons described as below:-
- A
Sendbutton at left footer, broadcasts a “PING” message via the LoRa App. In response, it receives back a "PONG" message from other WiPhones, having LoRa daughterboard and running LoRa app. The response will get display on the screen of sender's phone. - A
Backbutton takes user back to previous screen.

Implementation in Firmware
Identify Major Files & Functions
- GUI.h
- GUI.cpp
- typedef enum ActionID : uint16_t {}
- GUIMenuItem menu[xx] PROGMEM = {}
- processEvent (EventType event)
- changeState(int i)
- redrawScreen (bool redrawAll)
Disable LoRa Messaging
WiPhone firmware has LoRa messaging activated by default. Disable LoRa messaging to run this app.
You can do this by commenting out the following line in the Hardware.h file, which is available
in the main WiPhone source tree.
#define LORA_MESSAGING
Note
Disabling the above flag prevents a conflict of accessing the same hardware by two different apps at the same time.
Declaring a unique name for your app in GUI.h file
Search for "typedef enum ActionID" method in GUI.h and put your app name "GUI_APP_LoRaApp" as Action ID at designated place`.
Adding App Class into Header File
Insert following class code into GUI.h file.
class LoRaTestApp : public WindowedApp {
 public:
  LoRaTestApp( LCD& disp, ControlState& state, HeaderWidget* header, FooterWidget* footer);
  virtual ~LoRaTestApp();
  ActionID_t getId() { return GUI_APP_LoRaApp; };
  appEventResult processEvent(EventType event);
  void redrawScreen(bool redrawAll = false);
 protected:
  static const int EXIT_CNT = 5;
  ButtonWidget* bbKeys[2];
  bool anyKeyPressed;
  bool screenInited;

  RHSoftwareSPI* loraSPI;
  RH_RF95* rf95;

  LabelWidget* label1;
};
Instantiating the App
Before defining the App classes, search for GUI::enterApp(ActionID_t app) in GUI.cpp file and append below line in switch statement to instantiate the App object.
case GUI_APP_LoRaApp::
  // NOTE : THIS IS AN EXAMPLE LoRa APP
  runningApp = new LoRaTestApp(*screen, state, header, footer);
  break;
The designated place to add above line within the switch statement in code can be found at enterApp Method in GUI.cpp.
Define App Constructor
A constructor method that we already instantiated in step above, needs to be defined
first in GUI.CPP. Constructor for this app initializes a RadioHead library, which is used
to control the LoRa hardware on daughter board. Moreover, it sets up the Send and
Back buttons along with the label which is used to display the data received via LoRa communication.
Let’s add this constructor function for class LoRaTestApp.
LoRaTestApp::LoRaTestApp( LCD& lcd, ControlState& state, HeaderWidget* header, FooterWidget* footer)
  : WindowedApp(lcd, state, header, footer), screenInited(false) {
  header->setTitle("LoRa Test APP");
  footer->setButtons("Send", "Back");

  state.msAppTimerEventLast = millis();
  state.msAppTimerEventPeriod = 33;

  // Create all the widgets
  const uint16_t spacing = 1;
  uint16_t xOff = spacing;
  uint16_t yOff = header->height();

  loraSPI = new RHSoftwareSPI();
  rf95 = new RH_RF95(RFM95_CS, RFM95_INT, *loraSPI);

  loraSPI->setPins(HSPI_MISO, HSPI_MOSI, HSPI_SCLK);
  pinMode(RFM95_RST, OUTPUT);
  rf95->init();
  rf95->setFrequency(RF95_FREQ);
  rf95->setTxPower(23, false);

  label1 = new LabelWidget(0, (lcd.height() - fonts[AKROBAT_EXTRABOLD_22]->height()) / 2.5, lcd.width(), fonts[AKROBAT_EXTRABOLD_22]->height(),
                           "", WHITE, BLACK, fonts[AKROBAT_EXTRABOLD_22], LabelWidget::CENTER);
}
Declare and Define other Methods
This segments will show us a way of adding source code of other functions/ methods used in LoRaTestApp Example. We declare and define these methods within the firmware code to fully implement our example App and subsequently put in place in GUI.cpp file. These functions are defined outside the LoRaTestApp class and thus presented here with scope resolution operator (::) as below:
- LoRaTestApp::~LoRaTestApp();
- LoRaTestApp::processEvent(EventType event);
- LoRaTestApp::redrawScreen(bool redrawAll);
LoRaTestApp::~LoRaTestApp() This function defines LoRaTestApp's destructor to release memory after usage. All widgets must be registered and deleted by WiPhoneApp destructor.
     LoRaTestApp::~LoRaTestApp() {
  delete rf95;
  delete loraSPI;
}
LoRaTestApp::processEvent(EventType event);
This function defines the app events that are detected when a button is pressed on WiPhone Keypad.
In this method, Pressing Back button closes out the app while Pressing Send button sends out
a “PING” message to a remote LoRa message listner WiPhone. Apart from recognizing the button press events,
this method also receives a timer event which can be used to check for any data arriving. If the data
arrived is equal to “PING”, we sends back a "PONG" message in response.
     appEventResult LoRaTestApp::processEvent(EventType event) {
  appEventResult res = DO_NOTHING;
  if (LOGIC_BUTTON_BACK(event) ) {
    return EXIT_APP;
  }

  if (LOGIC_BUTTON_OK(event)) {
    rf95->send((uint8_t*)"PING", strlen("PING"));
    rf95->waitPacketSent();
  }

  if (event == APP_TIMER_EVENT) {
    if (rf95->available()) {
        // Should be a message for us now
        uint8_t buf[RH_RF95_MAX_MESSAGE_LEN] = {0};
        uint8_t len = sizeof(buf);

        if (rf95->recv(buf, &len)) {
            label1->setText((char*)buf);
            if (strcmp((char*)buf, "PING") == 0) {
              rf95->send((uint8_t*)"PONG", strlen("PONG"));
              rf95->waitPacketSent();
            }
        }
        else {
          log_e("LoRa: Unable to receive data");
        }
      }
  }

  res |= REDRAW_SCREEN;
  return res;
}
LoRaTestApp::redrawScreen(bool redrawAll); This method is used whenever user wants to update/ clear GUI for this app. Calling this method will redraw the default main activity screen designed for the App.
void LoRaTestApp::redrawScreen(bool redrawAll) {

  if (!this->screenInited) {
    redrawAll = true;
  }
  if (redrawAll) {
    lcd.fillRect(0, header->height(), lcd.width(), lcd.height() - header->height() - footer->height(), TFT_BLACK);
  }

  ((GUIWidget *) label1)->redraw(lcd);
  screenInited = true;
}