WiPhone Programming Instructions
Prerequisites
Hardware
For compiling and editing WiPhone firmware, you will need a computer capable of running the Arduino Desktop IDE and a microUSB cable. A modern Linux, MacOS or Windows operating system should work.
Software
The following software packages are required to compile the WiPhone firmware:
- Arduino Desktop IDE: https://www.arduino.cc
- Arduino core for WiPhone: https://wiphone.io/static/releases/arduino_platforms/WiPhone0.1.1.zip
- An Arduino plugin for uploading files to the ESP32 file system: https://github.com/me-no-dev/arduino-esp32fs-plugin
If you want to contribute to the firmware, you should also have the Git source-control management tool: https://git-scm.com/
Installing The Arduino Desktop IDE
Download the installer for your platform from the official Arduino website download page: https://www.arduino.cc/en/Main/Software
Follow the installation procedure for your operating system:
- For Linux, download the archive, extract it, and run "install.sh".
- For MacOS, extract/move the downloaded file to your Applications folder.
- For Windows, download and run the installer.
In all cases you can check the official instructions for more details.
Installing WiPhone-Arduino using Arduino IDE Boards Manager
If your Arduino IDE is recent enough (ver. 1.8+), you can install Arduino-ESP32 using the Arduino IDE's Boards Manager:
Start the Arduino Desktop IDE.
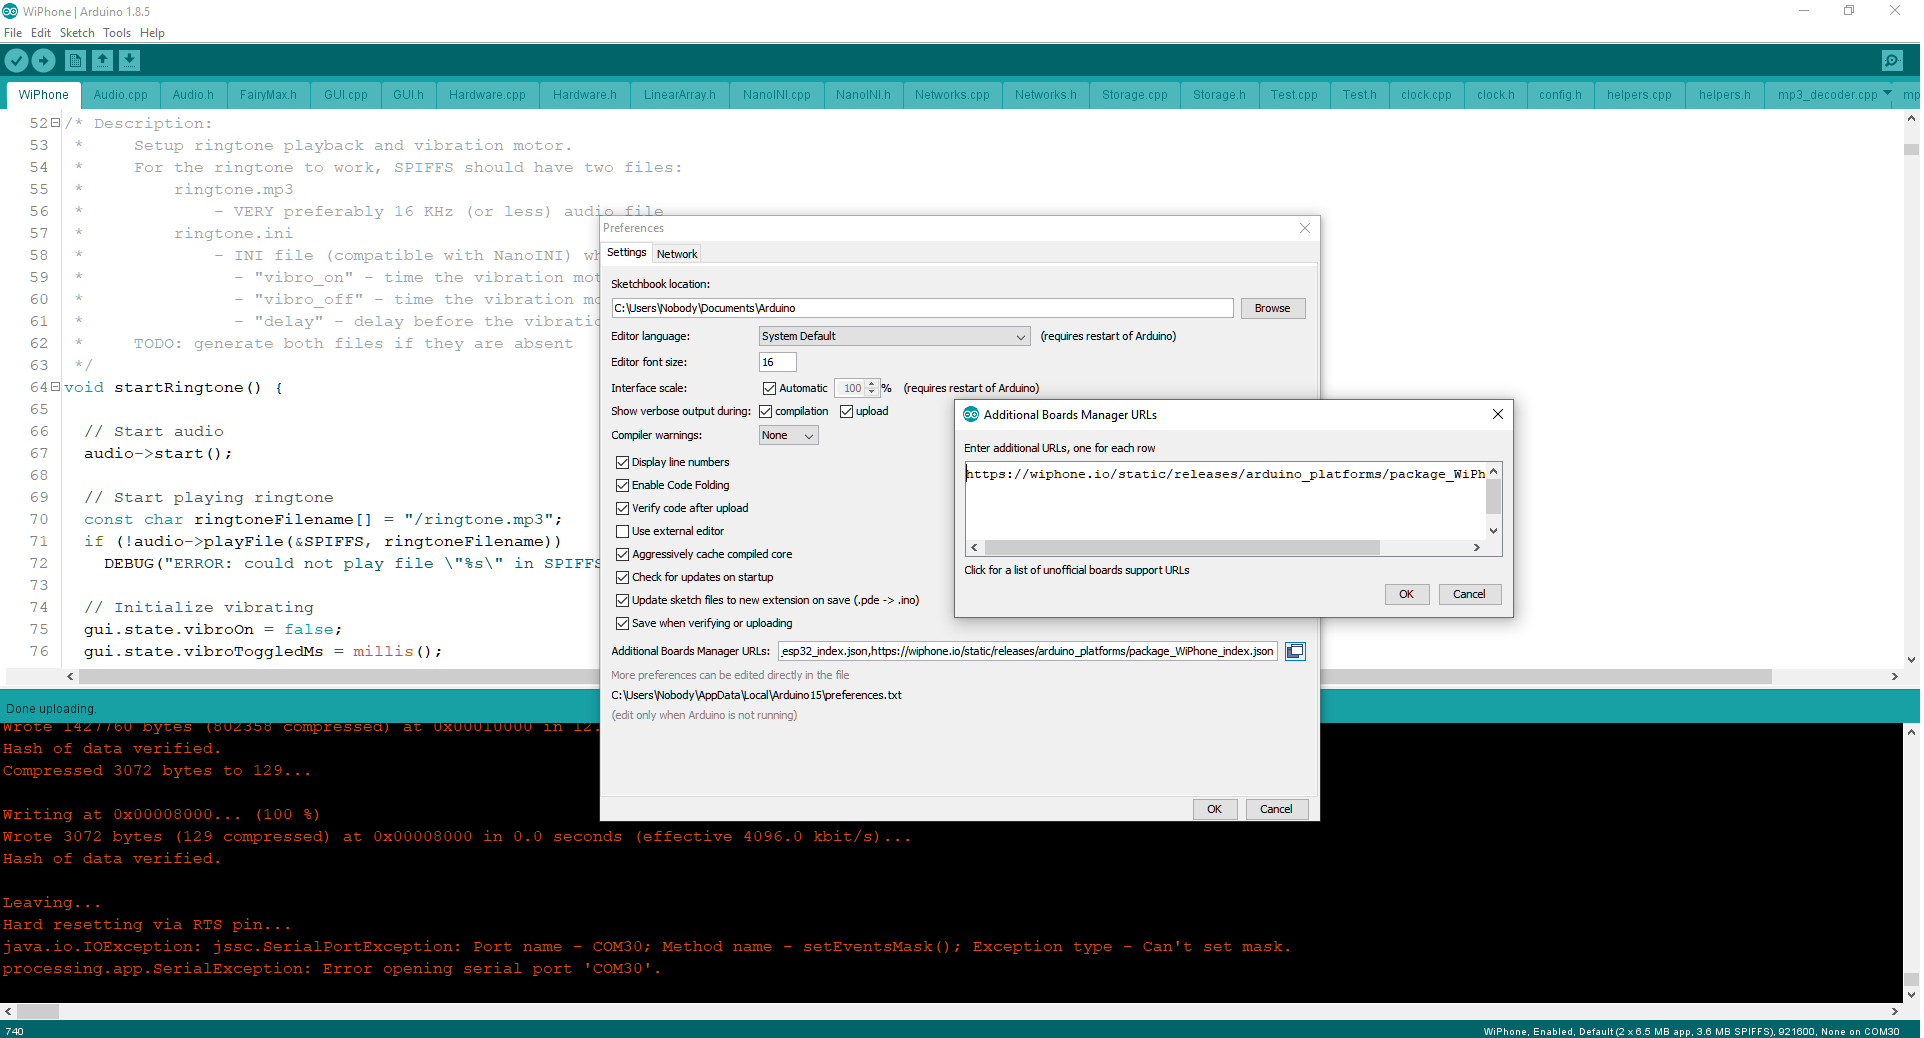
Open the Preferences window.
- Enter "https://wiphone.io/static/releases/arduino_platforms/package_WiPhone_index.json"(without quotes) into the Additional Board Manager URLs field.Note: You can add multiple URLs, separating them with commas.
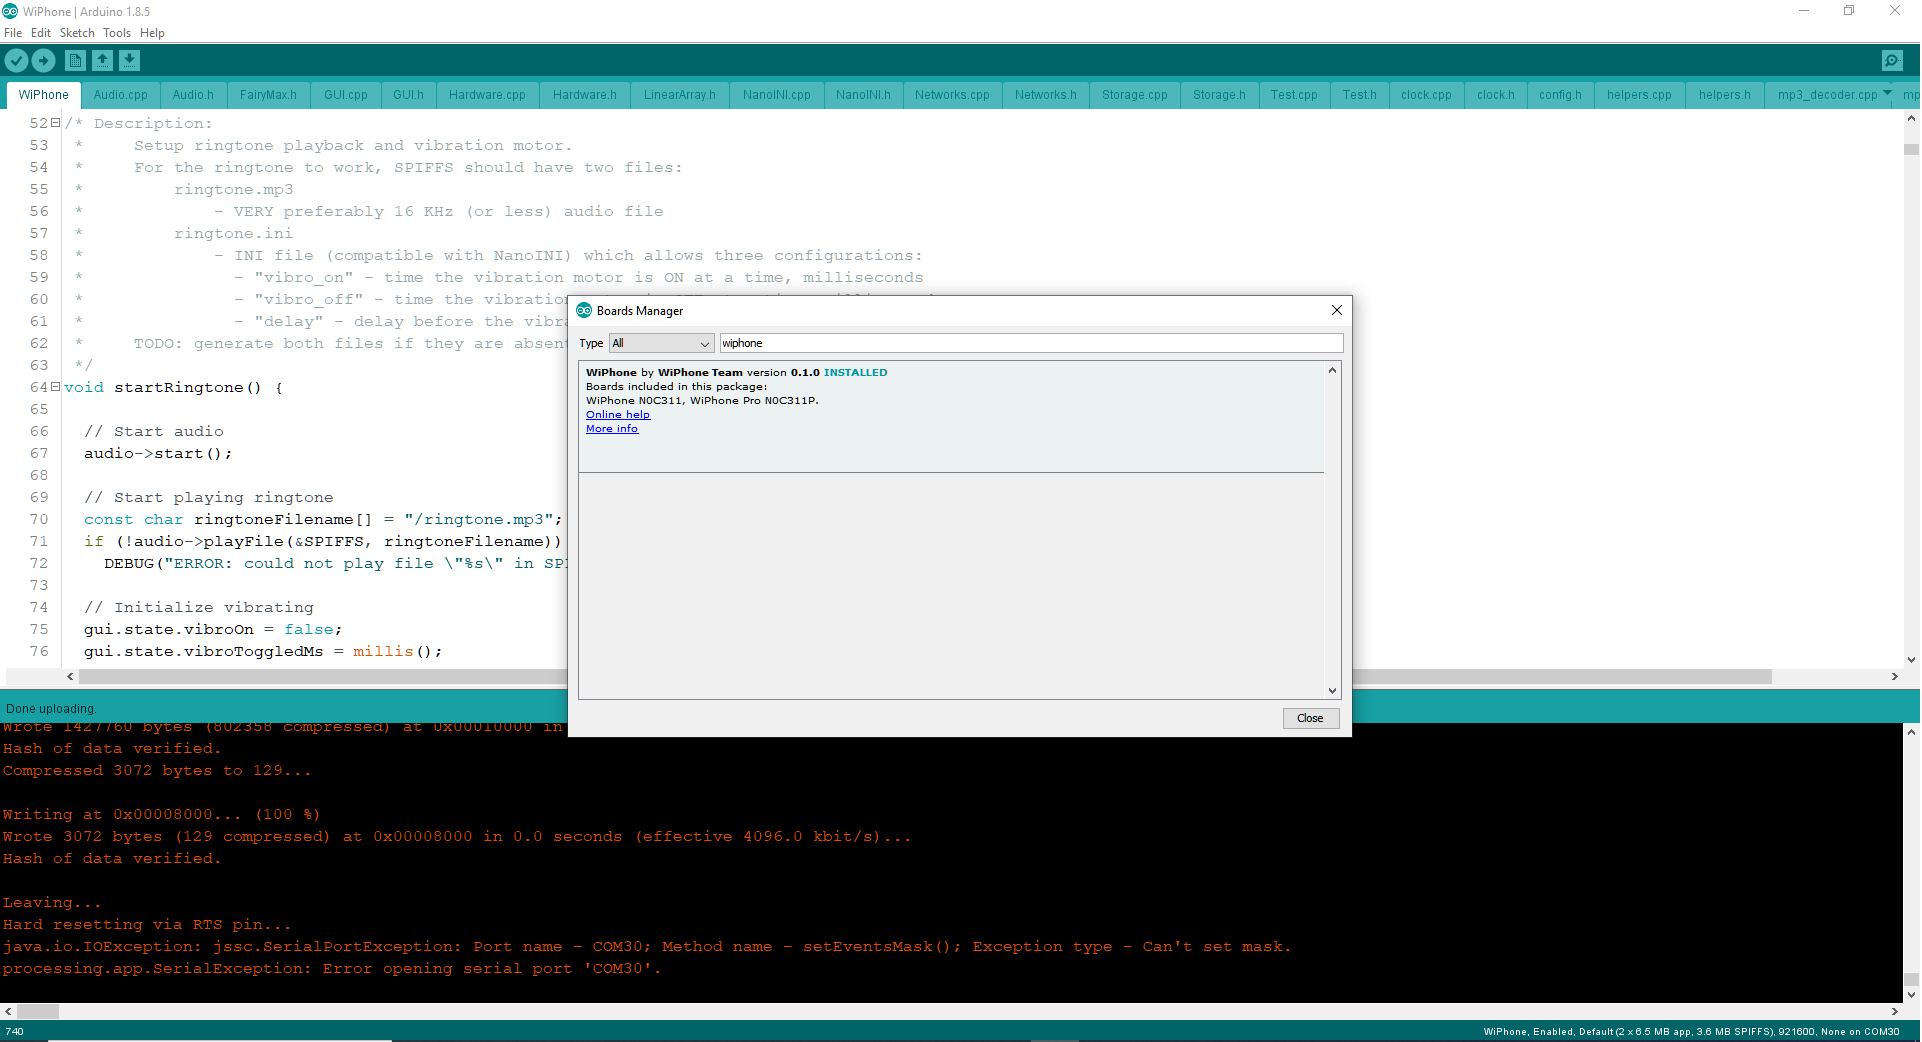
Open the Boards Manager... window by navigating to Tools > Board: >Boards Manager...
Search for "wiphone"and install the WiPhone package by the WiPhone Team.
Choosing a board type
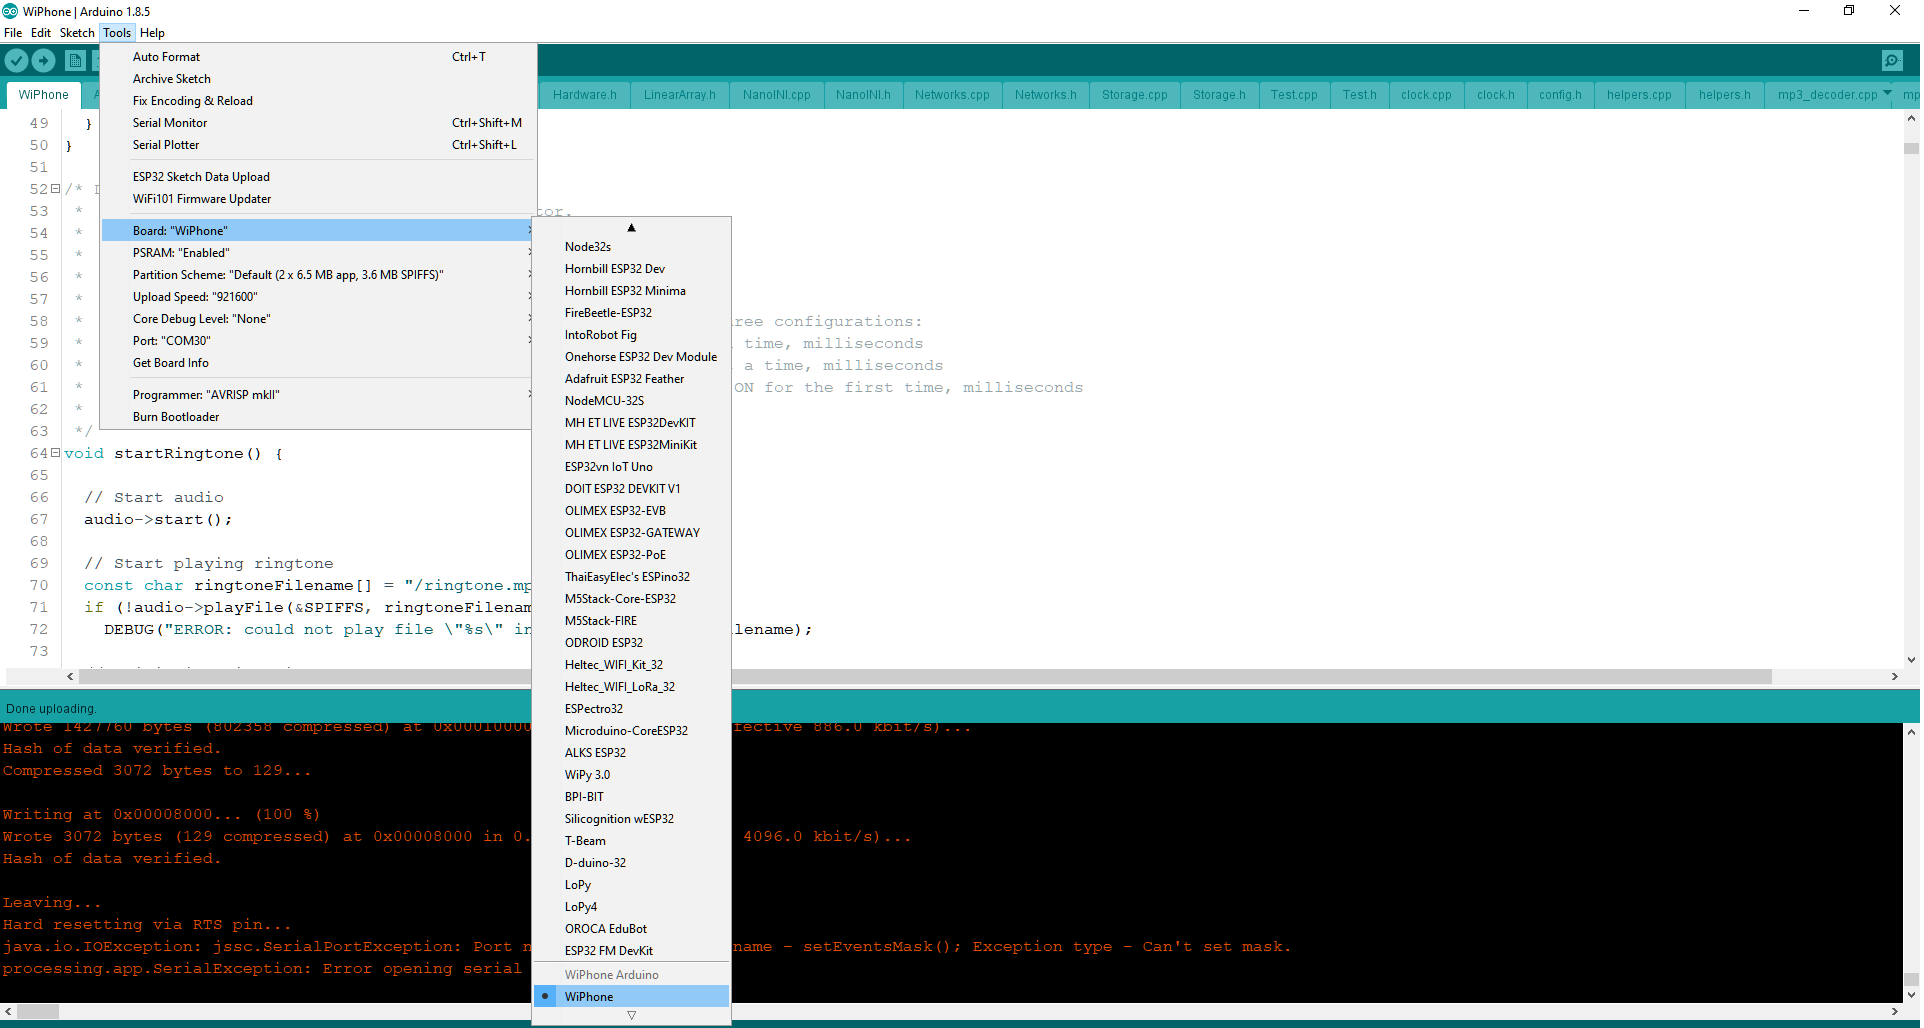
After installing WiPhone-Arduino, select the WiPhone board by navigating to Tools > Board: ... menu.
Warning
Changing the partition scheme will overwrite the internal flash file system (SPIFFS) causing loss of things like the phonebook and SIP accounts. While these can be easily restored if you have a backup, you may want to stick to a single partition scheme early in the development process to avoid data loss for frequently changing files.
Installing The Arduino Plugin for Uploading Files
This plugin is required to upload data files to the WiPhone's internal flash (SPIFFS). It is needed, for example, to load the ringtone file and background screen. It also formats the SPIFFS partition of the ESP32 to allow storing WiPhone data (like phonebook, SIP accounts, and settings) into the internal flash.
Warning
Using this plugin to load files into a WiPhone will overwrite ALL existing files in the SPIFFS partition, causing irreversible data loss. Use this only if you know what you are doing!
Installation procedure:
- Download the plugin archive:
https://github.com/me-no-dev/arduino-esp32fs-plugin/releases/download/1.0/ESP32FS-1.0.zip - Extract the archive and copy the extracted directory ESP32FS into the tools subdirectory of Arduino sketchbook directory:
- On Linux: create directory ~/Arduino/tools/ (you can run "mkdir -p ~/Arduino/tools/"in terminal) and copy the ESP32FS direcory into it.
- On MacOS: create directory ~/Documents/Arduino/tools/ (you can run "mkdir -p ~/Documents/Arduino/tools/"in terminal) and copy the ESP32FS direcory into it.
For more details, you may also consult the official installation instructions: https://github.com/me-no-dev/arduino-esp32fs-plugin#Installation
Obtaining A Copy Of The Firmware
Firmware is currently being reviewed by Early Testers. In the future this section will include a download link.
Compiling And Uploading Firmware
After obtaining firmware, make sure all the project files are stored in a directory called "WiPhone". Then, to compile and upload the firmware to WiPhone:
- Connect WiPhone to your computer with a microUSB cable.
- Open the file WiPhone.ini from the project directory in the Arduino IDE.
- Press button "Upload"in the top left corner of the Arduino IDE window (the button looks like a right arrow).
Uploading Data Files
To permanently store files in the WiPhone's internal flash file system (SPIFFS).
To upload data files from the "WiPhone/data"subdirectory to SPIFFS, do the following:
- Make sure that the plugin for uploading files to ESP32 is installed(otherwise, see the dedicated section above).
- Navigate to the "Tools"menu in the Arduino IDE and press "ESP32 Sketch Data Upload".
What's In The Project Directory
Some notable files and subdirectories from the source directory:
- WiPhone.ino: Arduino project file: a C++ file with the main loop and the mainphone logic
- GUI.h/GUI.cpp: main GUI logic files (widgets and apps are defined here)
- tinySIP.h/tinySIP.cpp: a minimal implementation of the SIP protocol, optimized for small footprint
- src/
directory for code that is not in active development (these files are required for the WiPhone's operation, but will not be opened by Arduino IDE by default, unlike files in the main directory)- src/TFT_eSPI/: an LCD graphics library for the ESP32; includes sprites and font rendering capabilities
- src/VoIP/: audio codecs and other definitions for VoIP
- src/assets/: static data components (such as fonts, icons, background image, etc.)
- src/drivers: code that operates different integrated circuits (ICs) of the WiPhone
- data/: files to be loaded into WiPhone’s internal flash file system (SPIFFS)
- tools/: custom Python scripts to generate "assets", namely 3-bit antialiased fonts and icons
- other WiPhone source files in the main directory
Developing Custom "Apps"
Developing custom apps in WiPhone's Arduino firmware should be possible with a moderate understanding of C++. This section covers a few of the less obvious aspects.
Steps for adding a custom app
Declare a unique ID for the new app.
This is done in the ActionID enumeration:
Find "typedef enum ActionID"in file GUI.h. Add a unique name below the line "GUI_BASE_APP = 0x4000". For example, "GUI_APP_MYAPP".GUI.h:
299
300
301
302
303
304
305
306
307
308
309
310
311
312
313
314
// Menu actions
typedef enum ActionID : uint16_t {
  NO_ACTION = 0,
  GUI_ACTION_MAINMENU,
  GUI_ACTION_SUBMENU,
  GUI_ACTION_RESTART,

  // Specific applications
  GUI_BASE_APP = 0x4000,      // application flag

  // My Section
  GUI_APP_MYAPP,      // add your app like this

  // Interface
  GUI_APP_MENU,
  GUI_APP_CLOCK,
Add your app ID into the menu.
Find ''GUIMenuItem menu'' in file GUI.h.
Increase size of the array by 1 and add a line of the following form into the definition of the array "menu"{ XX, YY, "Menu Name", "", "", GUI_APP_MYAPP }
- XX - should be a unique ID of the menu item (for simplicity, it should be the current size of the array)
- YY - is ID of the menu in which you want your app to appear.
GUI.h:2155 2156 2157 2158 2159 2160 2161 2162 2163 2164 2165 2166 2167 2168 2169 2170 2171 2172 2173 2174 2175 2176 2177 2178 2179 2180 2181 2182
GUIMenuItem menu[36] PROGMEM = {  // increment size by one to add a new app

  // TODO: button names can be removed

  { 0, -1, "Clock", "Menu", "", GUI_APP_CLOCK },

  { 1, 0, "WiPhone", "Select", "Back", GUI_ACTION_SUBMENU },

  // Main menu items
  // TODO: call log (icons: Call_log_b/Call_log_w)
  { 2, 1, "Phonebook", "", "", GUI_APP_PHONEBOOK },
  { 20, 1, "Messages", "", "", GUI_APP_MESSAGES },
  { 3, 1, "Tools", "Select", "Back", GUI_ACTION_SUBMENU },
  { 4, 1, "Games", "Select", "Back", GUI_ACTION_SUBMENU },
  { 5, 1, "Settings", "Select", "Back", GUI_ACTION_SUBMENU },
  { 13, 1, "Reboot", "", "", GUI_ACTION_RESTART },

  // Tools (3)
  { 25, 3, "MP3 player", "", "", GUI_APP_MUSIC_PLAYER },
  { 31, 3, "Audio recorder", "", "", GUI_APP_RECORDER },
  { 14, 3, "Scan WiFi networks", "", "", GUI_APP_NETWORKS },    // duplicate from below
  { 7, 3, "Note page", "", "Back", GUI_APP_NOTEPAD },
  { 21, 3, "UDP sender", "", "", GUI_APP_UDP },
  { 28, 3, "Development", "Select", "Back", GUI_ACTION_SUBMENU },

  // Development (28)
  { 36, 28, "My App", "", "", GUI_APP_MYAPP },
  { 27, 28, "Diagnostics", "", "", GUI_APP_DIAGNOSTICS },
Instantiate your app. This is, basically, just letting the GUI know how to call your app’s constructor.
Find definition of method "GUI::enterApp()"in file GUI.cpp and add code to create a new object out of your app class. (Do it similarly to other apps.)
1126
1127
1128
1129
1130
1131
1132
1133
1134
1135
1136
1137
1138
1139
1140
1141
void GUI::enterApp(ActionID_t app) {
  GUI_DEBUG("entering app");

  // Free dynamic memory
  cleanAppDynamic();
  flash.end();

  // Change to new app
  switch(app) {
  case GUI_APP_MYAPP:
    runningApp = new MyApp(audio, *screen, state, header, footer);
    break;
  case GUI_APP_MENU:
    state.setInputState(InputType::Numeric);
    menuDrawn = false;
    break;
Declare the app class and methods.
The easiest way to do this is to find an existing app similar to the one you want to build, copy its code, changing the class name and code to do the things you want.The app class declaration goes in GUI.h and method definitions go in GUI.cpp.The app class must derive from ''WiPhoneApp'' or of its derivatives (like "WindowedApp"or "FocusableApp", or both).
Make sure the class method "getId"returns the ID that you created in the first step.
Methods go in GUI.cpp. Each app defines two main methods: "processEvent()"and "redrawScreen()".
"processEvent(EventType event)"is the method that is called by GUI to allow your app process events and update its internal state accordingly. The events are, for example, button presses, timers (as requested by your app) or scheduled events (as scheduled by your app).
"redrawScreen(bool redrawAll)"is the method that is called by GUI to allow your app to redraw the screen partially and/or telling your app that it should redraw the screen entirely (like after the screen was redrawn by some other app, like a call or a screen lock).
The MyApp demo is pasted below.
GUI.h
1043
1044
1045
1046
1047
1048
1049
1050
1051
1052
1053
1054
1055
1056
1057
1058
1059
1060
1061
1062
class MyApp : public WindowedApp, FocusableApp {
 public:
  MyApp(Audio* audio, LCD& disp, ControlState& state, HeaderWidget* header, FooterWidget* footer);
  virtual ~MyApp();
  ActionID_t getId() { return GUI_APP_MYAPP; };
  appEventResult processEvent(EventType event);
  void redrawScreen(bool redrawAll=false);

 protected:
  Audio* audio;

  bool screenInited = false;

  // WIDGETS
  RectWidget* clearRect;
  RectIconWidget* iconRect;

  LabelWidget*  demoCaption;
  LabelWidget*  debugCaption;
};
GUI.cpp
1466
1467
1468
1469
1470
1471
1472
1473
1474
1475
1476
1477
1478
1479
1480
1481
1482
1483
1484
1485
1486
1487
1488
1489
1490
1491
1492
1493
1494
1495
1496
1497
1498
1499
1500
1501
1502
1503
1504
1505
1506
1507
1508
1509
1510
1511
1512
1513
1514
1515
1516
1517
1518
1519
1520
1521
1522
1523
1524
1525
1526
1527
1528
1529
1530
1531
1532
1533
1534
1535
1536
1537
1538
1539
1540
1541
1542
1543
1544
1545
1546
1547
1548
1549
1550
1551
1552
1553
1554
1555
1556
1557
1558
1559
1560
1561
1562
1563
1564
1565
1566
1567
1568
1569
1570
1571
1572
1573
1574
1575
1576
1577
1578
1579
1580
1581
1582
1583
1584
1585
1586
// - - - - - - - - - - - - - - - - - - - - - - - - - - - -  MyApp demo app  - - - - - - - - - - - - - - - - - - - - - - - - - - - -

MyApp::MyApp(Audio* audio, LCD& lcd, ControlState& state, HeaderWidget* header, FooterWidget* footer)
       : WindowedApp(lcd, state, header, footer), FocusableApp(2), audio(audio)
{
  GUI_DEBUG("MyApp create");
  const char* s;

  // Create and arrange widgets
  header->setTitle("MyApp Demo");
  footer->setButtons("Yes", "No");
  clearRect = new RectWidget(0, header->height(), lcd.width(), lcd.height() - header->height() - footer->height(), WP_COLOR_1);

  // State caption in the middle
  const uint16_t spacing = 4;
  uint16_t yOff = header->height() + 26;
  demoCaption = new LabelWidget(0, yOff, lcd.width(), fonts[AKROBAT_BOLD_20]->height(),
                                 "Hello World", WP_ACCENT_S, WP_COLOR_1, fonts[AKROBAT_BOLD_20], LabelWidget::CENTER);
  yOff += demoCaption->height() + (spacing*2);

  // Make an icon
  iconRect = new RectIconWidget((lcd.width()-50)>>1, yOff, 50, 50, WP_ACCENT_1, icon_person_w, sizeof(icon_person_w));
  yOff += iconRect->height() + (spacing*2);

  /*// Name and URI above
  s = controlState.calleeNameDyn!=NULL ? (const char*) controlState.calleeNameDyn : "";
  nameCaption =  new LabelWidget(0, yOff, lcd.width(), fonts[AKROBAT_EXTRABOLD_22]->height(), s, WP_COLOR_0, WP_COLOR_1, fonts[AKROBAT_EXTRABOLD_22], LabelWidget::CENTER);
  yOff += nameCaption->height() + spacing;
  s = controlState.calleeUriDyn!=NULL ? (const char*) controlState.calleeUriDyn : "";
  uriCaption =  new LabelWidget(0, yOff, lcd.width(), fonts[AKROBAT_BOLD_20]->height(), s, WP_DISAB_0, WP_COLOR_1, fonts[AKROBAT_BOLD_20], LabelWidget::CENTER);*/

  // Debug string: shows some simple debug info
  //yOff += uriCaption->height() + 20;
  //s = controlState.lastReasonDyn != NULL ? (const char*) controlState.lastReasonDyn : "";
  s = "I'm Awesome!";
  debugCaption = new LabelWidget(0, yOff, lcd.width(), fonts[AKROBAT_BOLD_16]->height(), s, WP_DISAB_0, WP_COLOR_1, fonts[AKROBAT_BOLD_16], LabelWidget::CENTER);

  //reasonHash = hash_murmur(controlState.lastReasonDyn);
}

MyApp::~MyApp() {
  GUI_DEBUG("destroy MyApp");

  delete demoCaption;
  delete debugCaption;
  //delete nameCaption;
  //delete uriCaption;
}

appEventResult MyApp::processEvent(EventType event) {
  GUI_DEBUG("processEvent MyApp");
  appEventResult res = DO_NOTHING;

  if (LOGIC_BUTTON_BACK(event)) {

    demoCaption->setText("Back Button");
    res |= REDRAW_SCREEN;

  } else if (LOGIC_BUTTON_OK(event)) {

    demoCaption->setText("OK Button");
    footer->setButtons("OH", "NO");
    res |= REDRAW_SCREEN | REDRAW_FOOTER;

  } else if (event == WIPHONE_KEY_UP || event == WIPHONE_KEY_DOWN) {

    int8_t earpieceVol, headphonesVol, loudspeakerVol;
    audio->getVolumes(earpieceVol, headphonesVol, loudspeakerVol);
    int8_t d = event == WIPHONE_KEY_UP ? 6 : -6;
    earpieceVol += d;
    headphonesVol += d;
    loudspeakerVol += d;
    audio->setVolumes(earpieceVol, headphonesVol, loudspeakerVol);
    audio->getVolumes(earpieceVol, headphonesVol, loudspeakerVol);
    char buff[70];
    snprintf(buff, sizeof(buff), "Speaker %d dB, Headphones %d dB, Loudspeaker %d dB",  earpieceVol, headphonesVol, loudspeakerVol);
    debugCaption->setText(buff);

  }

  return res;
}

void MyApp::redrawScreen(bool redrawAll) {
  GUI_DEBUG("redrawScreen MyApp");

  if (!screenInited || redrawAll) {
    GUI_DEBUG("redraw all");
    // Initialize screen
    ((GUIWidget*) clearRect)->redraw(lcd);

    ((GUIWidget*) iconRect)->redraw(lcd);
    ((GUIWidget*) demoCaption)->redraw(lcd);
    ((GUIWidget*) debugCaption)->redraw(lcd);
    //((GUIWidget*) nameCaption)->redraw(lcd);
    //((GUIWidget*) uriCaption)->redraw(lcd);

    //lcd.fillRect(95, 240, 50, 20, WP_ACCENT_1);     // DEBUG: very strange bug with white pixels over black border

  } else {

    // Refresh only updated labels
    if (demoCaption->isUpdated()) {
      GUI_DEBUG("stateCaption updated");
      ((GUIWidget*) demoCaption)->redraw(lcd);
    }
    if (debugCaption->isUpdated()) {
      GUI_DEBUG("debugCaption updated");
      ((GUIWidget*) debugCaption)->redraw(lcd);
    }
    /*if (nameCaption->isUpdated()) {
      GUI_DEBUG("nameCaption updated");
      ((GUIWidget*) nameCaption)->redraw(lcd);
    }
    if (uriCaption->isUpdated()) {
      GUI_DEBUG("uriCaption updated");
      ((GUIWidget*) uriCaption)->redraw(lcd);
    }*/
  }
  screenInited = true;
}